FAQ: Make a turntable from a CD
Q. Where can I find instructions for building a really cheap small turntable?
A. You’ve come to the right place, my friend. I originally prepared the following article for publication as part of the story of my Gn15 layout, The SAP Line, which features an ultra-inexpensive (practically FREE) small turntable made from a spare CD and its case (see Scrapbook #52a). The layout article has now appeared, but this element was omitted — so here it is for you!
How to make a turntable from a CD & Case
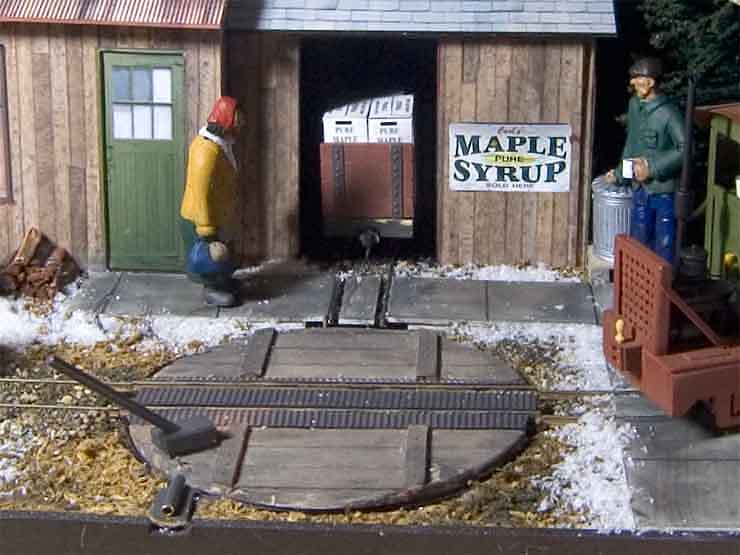
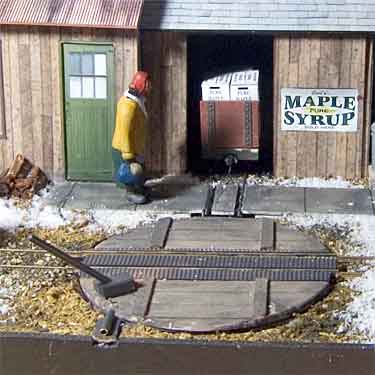
The centerpiece of The SAP Line is the small, 4¾in turntable shown above. It was made from a scrap CD and its case, along with materials that were basically lying around the house. Total cost was roughly zero!
Here’s how it was made. For starters, the basic materials needed (left photo below) are a CD (or DVD) disk … use any old one that you don’t need any more; plus the case that it came in, preferably the “thin” style, though any style can be used; a length of straight track — anything from 4¾ to 5½ inches long will do just fine; and some shim material (I used shirt cardboard), to lift the case to the correct track height.

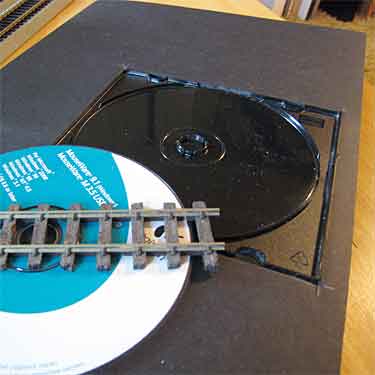
Step 1 (right photo above) is to cut a case-sized hole in your baseboard and mount the CD case in it, shimmed up to track height. I used three layers of black foamcore for a baseboard on The SAP Line, so I just cut a hole in the top layer and fitted the case inside. Then a few shims were slid underneath the case to bring it to he proper height (trial and error is the best method to do this). The CD will continue to pivot on the same ring assembly in the case, but you may want to trim back some of the other raised moldings to make sure the disk can turn freely.
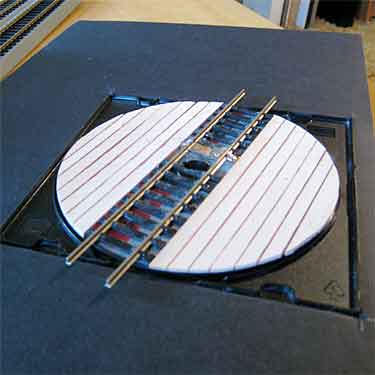
Next, glue your length of track onto the CD (left photo below). Take some care to make sure it is positioned exactly in the center of the disk! The rail lengths are less critical as they can always be trimmed, but you must be sure the tie (sleeper) strip is centered as exactly as possible.
Planking the deck of the disk is easy and fun. You can use almost any flat material you have on hand. I used popsicle sticks (I bought a bagful of them at a crafts store several years ago, and use them for all kinds of workshop aids).
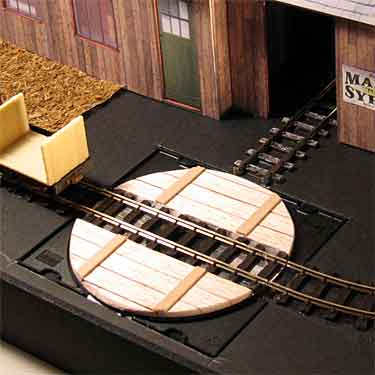
I felt that a little more decoration would help, so I put on cross braces (right photo above). Mine are made of stripwood, but anything flat will do, even cardboard (which could also be used for the planking). If you want to be even fancier, clip the shafts off some dressmaker’s pins, leaving a small “handle” under the pinhead, and glue the pins into small holes drilled in the cross braces to represent boltheads. I didn’t bother and just put dots of black color on the braces in bolt-like spots after weathering.
Your turntable is nearly ready. If you want to electrify it (so that locomotives can run on it), you have several options. The easiest is just to run a pair of wires up through a small hole drilled within the CD pivot ring, solder one wire to the outside of each rail, and attach the other ends to your power pack through whatever wiring system you use. This works fine for The SAP Line because the turntable only moves through 90 degrees, replacing a space-wasting turnout in order to serve the shipping dock in the Sugar House Annex.
If you want to reverse the locomotive’s direction, a somewhat more elaborate system is needed — but it is still easiy made from materials you probably have on hand. It was developed by Steve Bennett, of Sidelines Models in Exeter, England.
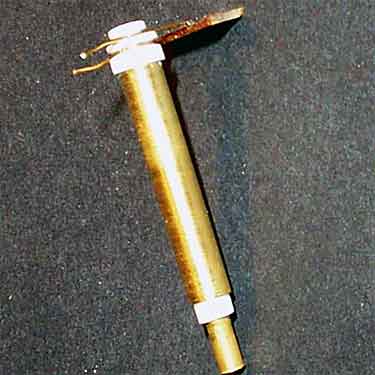

Key to the electrical connections is a center post (left photo above) that will be glued into place in the basebaord at the center of the hole in the CD. Note that this post does not rotate, it is glued in place permaently. Steve used a small piece of PCB copper-clad material to mount two spring-brass wires that will act as wiper contacts (pick-up wires).
Steve explains, “The centre post is made up of alternate layers of plastic and brass tubes, the plastic ones being for insulation and to create guides for the wiper pick-ups. There are no moving parts, other than the CD in its case. The centre post is fixed in place and the pick-up plate will be glued to the CD, rotating with it. You will need to run small wires to the rails from the pick-up plate which will sit between them once a couple of sleepers (ties) have been removed to make room.
“The power is fed to the two brass tubes under the baseboard (I do it it with crocodile/alligator clips but solder works fine), then via the two brass wipers to the rails. The whole thing is very simple, and there’s no real need for much accuracy with this method as the CD case acts as the pivot, and as long as the centre post is reasonably central the spring in the wipers will compensate.
“The closer view (right photo above) shows how it was a simple matter to bridge from the PCB pickup plate to the rail. With hindsight, I would have used a longer piece of Printed Circuit Board and made the connection to the outside of the rail, it would have been easier to get at. This will be covered once a timber deck has been added.”
Finishing touches can be as elaborate as your imagination will permit. The only essential is a handle for turning the table. It can be any stiff rod … I used a piece of brass rod from my scrap box. Coat hanger wire would probably work as well. It’s supported by a small piece of wood glued to the deck.
Weather the whole thing to taste, add rust to your bolts, etc. I added strips of textured styrene (again from the scrap box) on either side of the rails and between them, to simulate slip-proof steel decking to reinforce the rails. Just planking the whole thing would also work very well.
If you’re using the table for actually turning locomotives, you will need to wire a DPDT reversing toggle between the table and your power pack, treating your new turntable exactly like any reversing section on the layout.
And now, sit back and enjoy your new turntable, made with a minimum effort at minimum cost and requiring minimum space!