Secrets of Designing Micro Layouts
[This article was originally published in Model Trains International magazine (issue #41), and later became Chapter 1 in my first book, “52 Micro Layouts You Can Build”. Because the book is now out of print, the article is published here. It’s copyright © 2002 and 2005 by Carl Arendt, all rights reserved.]
Planning an ultra-small micro layout is slightly different from traditional model railway design methods. It has a lot in common with theatrical stage set design, where you carefully pick a single location then figure out how to squeeze the illusion of it into an extremely small space. Imagine a stage designer crying, “What?! You want all three pyramids and the Sphinx?!” That’s the challenge.
Like stage designers, you’ll find yourself using a lot of special tricks including flexible backdrops, low-relief and flat models of structures, forced perspective, behind-the-scenes fiddle yards, and carefully chosen rolling stock. Most of these ideas are featured regularly in model magazines and of course, on this site.
Why go to all this trouble? Because a micro layout fits into even the smallest flat or bedroom. You can finish it in a reasonable amount of time at reasonable cost. It can be carefully detailed to any degree you wish, and it will provide a significant amount of operating fun.
The requirement for “operating fun”—things to do on the layout—is what distinguishes a micro layout from a diorama or a module. A micro layout is a self contained, working model railway with a clear purpose and operating capability — usually occupying less than three or four square feet!
Let’s Design an Example
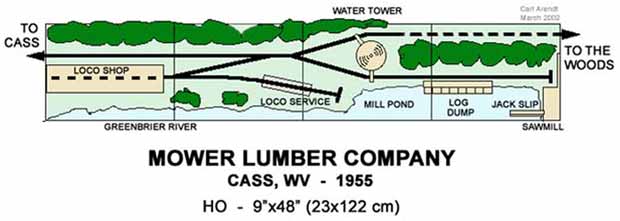
Here are some of the design tricks I use to create micro layouts. To illustrate, I took on the challenge of designing a U.S. style micro logging layout that has both accurate modeling and operating potential — in less than four square feet! The result is Mower Lumber Co. — Cass, West Virginia – 1955. It actually occupies 9”x48” — just three square feet. Here’s how it was designed.
STEP 1 – Pick your locale and era to suit your taste in scenery and layout operations.
 After mulling a number of locations and consulting half a dozen logging picture books from the library, I picked Cass, West Virginia as my area to model.
The lumber line headquartered at Cass has been a spectacular example of mountain railroading since 1903, and it’s still going strong as a tourist line. The road has always featured geared Shay locomotives operating on tight curves and 11% grades amid amazingly beautiful West Virginia mountain scenery. It’s a railfan’s paradise.
As my modeling era I picked 1955, near the end of the line’s commercial life, because much of the timber was logged out by that time so the trains were shorter and would require less space to model. Owned by the Mower Lumber Company, the little railroad brought hardwoods and spruce down Bald Mountain to the sawmill at Cass, right at the base of the hill alongside the Greenbrier River.
The railroad features a number of very compact scenes to model, so Cass in 1955 is ideal as a source of inspiration for a micro layout.
STEP 2 – Limit your setting and make sure it has operating possibilities.
A micro layout basically has room for only one scene, so it’s important to make sure the scene has the potential to keep you busy once it’s built. Main line running, for instance, is pretty much out of the question. (I realize that someone will immediately prove me wrong!)
At Cass, there are three excellent possibilities for a micro scene.
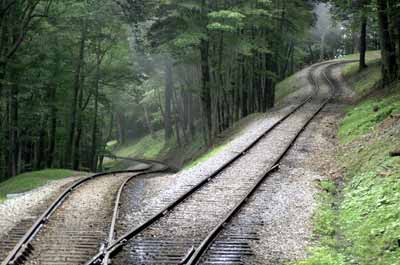
The switchbacks offer 11% grades and wonderful forest scenery broken by occasional vistas of the distant West Virginia mountains. This setting is very beautiful, and I find the photograph endlessly inspiring, but the trains just run right through it. There’s not much else to do there. Operating and shunting possibilities are very limited despite the scenic grandeur of the setting.
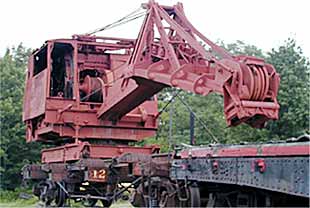
The landing, where logs are loaded onto flat cars would make a wonderful animated model or diorama. The log loader (a large, specialized type of crane) moved along the decks of the flat cars on tracks or rollers, loading logs onto the cars as it went. Keystone Locomotive Works make excellent model kits of a Barnhart log loader and log buggies that can duplicate this fascinating operation.
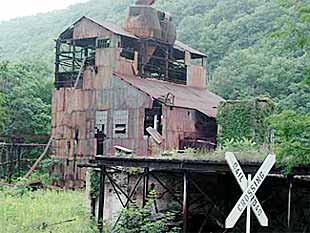
The third choice, the sawmill, is where logs are dumped from the cars into the mill pond to be taken up into the mill and sawed into boards. The mill at Cass was in a spectacular scenic setting beside the Greenbrier River. It featured a log dump into the mill pond, and right down the line was the Cass company store where supplies and provisions were regularly loaded into boxcars for delivery to the woodsmen. There was also an interchange with the Chesapeake and Ohio Railroad down at Cass.
Either the landing or the sawmill would make a wonderful micro layout. I chose the sawmill for my design on the grounds that it offered some extra switching possibilities with the added line down to the company store and the C&O.
STEP 3 – Pick a scale and gauge.
This is not an easy choice! I usually model narrow gauge scenes in my micro layouts, because the tracks and rolling stock take up much less room than standard gauge trains. The prototype roads often chose narrow gauges for the same reasons!
And my favorite size is 1:22.5 scale on 16.5mm gauge (called Gn15) using a typical industrial radius of six inches. But none of those choices would do in this case — Cass is a standard gauge line that uses historic and delightful Shay locomotives.
So I picked HO scale for this design because there are now several affordable Shay models available, and HO scale is small enough to fit into a very tiny layout. Rolling stock is easy to obtain and could include a two-truck Shay from Bachmann, Roundhouse or Keystone, along with some short flat cars.
STEP 4 – Get out your shoe horn.
Look for creative ways to jam very large scenes and structures into very tiny spaces!
It’s time to start doodling layout plans. At Cass, the “bottom of the hill” is relatively constrained in area because it’s in a narrow valley. But the sawmill is gigantic, spreading over acres of prime bottomland!
So the mill has to go at one end of the layout with most of it painted on the backdrop. The mill pond can be suggested near the front of the platform and theoretically continue beyond the front edge, saving lots of valuable space.
Perhaps an inch or two of the sawmill could be built up in low relief, so we can model a jack slip — the incline that hoists the logs from the pond up into the sawing room above. A working jack slip might be an interesting piece of animation for this layout.
Obviously, the line up the mountain to the woods is much too long for modeling, so we quickly decide to make it a duck-off to a backstage holding track, where consists are changed, logs are loaded onto the flat cars, etc. Fortunately terrain on the north side of the tracks (away from the river) is nearly vertical and almost solid with trees, so a backdrop close behind the tracks can be convincing, and the woods line can comfortably slip between the trees to vanish.
The track plan is beginning to take form.
STEP 5 – Plan the details.
This is the most important part of making a layout fun to build and operate.
For example, because the mill pond is fed by the lovely Greenbrier River we have a chance to model a bit of the river itself along the front of the layout, where it can mirror the trains in a nice scenic setting.
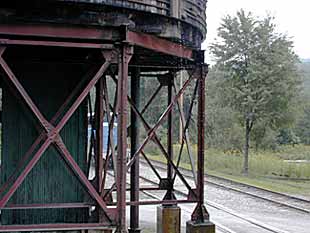 A “must” for modeling is the Cass water tower,, which is very familiar to tourists because every train stops there for water. Fortunately it’s almost beside the sawmill, so it’s easy to add.
And finally, the line over to Cass is too long to be included in its entirety, but we need to suggest its presence and somehow arrange for it to duck out of sight. So we think about the loco shop, which in reality is a couple hundred yards to the north along the line into the woods.
What’s actually there alongside the river is a rusting corrugated metal storage building. So we decide to use a little modeler’s license and substitute the well-maintained engine shops for the old storage building. As a bonus we gain another operating possibility, and the long, high shop building can conceal most of the track to Cass.
At this point, our initial sketching is becoming pretty detailed. But before we begin inking in the lines, there’s one more crucial detail to consider.
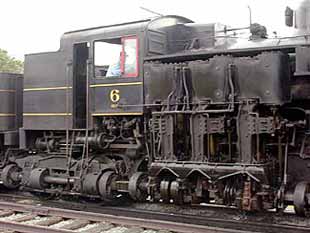 A Shay locomotive has all its working parts on the right-hand side. We need to be sure that the working side of our model locomotive is presented to the spectators. And sure enough, by a fortunate chance Cass is arranged so that the locomotive’s fascinating gears and cylinders are always facing the river — and our layout’s viewers — all the time.
So our design is complete — we’ve created a realistic HO scale U.S. logging line on a bookshelf measuring 9”x48” (23 x 122 cm). Our model’s track patterns diverge a bit from the prototype in order to fit into the tiny space, but the operations we perform are the same as their full-sized counterparts.
How about the operating potential?
Because operation is a major goal, let’s see how the Mower Lumber Co. runs its micro railroad. Flat cars of logs appear from the woods (from the holding track) with a Shay locomotive pulling, its nose facing uphill. For safety reasons, the locomotive is put at the lower end of a train on the mountain line.
The Shay pulls its train clear of the wye switch, the brakeman bends the iron, and the flats are shoved into the mill track where the logs will be dumped into the pond (a wonderful modeling challenge).
The loco uncouples, takes on water at the famous Cass water tower, and backs down the track to Cass to pick up a carload of supplies at the Cass company store or a hopper car of coal from the C&O for our hungry road engines.
Our Shay might also get some treatment at the engine service track, which is “front and center” for the benefit of loco lovers. Eventually the engine returns to the mill track, couples up to the now-empty log flats, backs to clear the wye switch, and pushes on up the big hill (offstage). A whistle sounds in the distance, and quiet returns to the Greenbrier valley. Until the saw mill resumes operations…

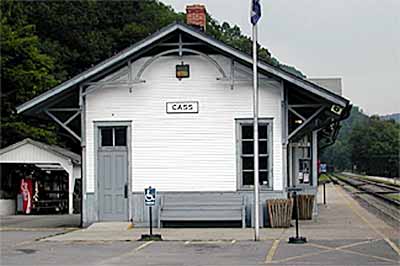
(All photos of Cass were taken during a visit in August 2001.)