Constructing the Squarefoot
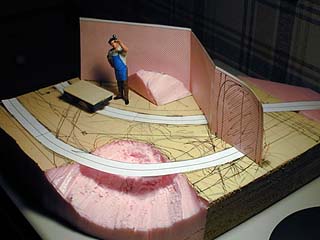
1.It all started with a square of pink insulating foam (the blue kind would have done as well). I painted it an earthy tan color so I could doodle on it. Then, after some planning, paper track templates were fitted and some initial carving took place. For me, a grapefruit knife is the best tool for this kind of work. The corner was rounded using a hot-wire foam cutter. Mine is called “The Wonder Cutter”. It came from the floral department of a crafts store (Ames) and cost $7.95.
The initial mockup is shown at the left. The plan to which it was made is displayed in the Squarefoot Design page.
2.Next I laid the track, gluing the crossties (sleepers) to the foam using Elmer’s white glue (beware clear glues, they may dissolve the foam!). Rails were spiked directly into the basswood ties, four spikes per tie.
At this point, I made a fairly accurate paper mockup using a computer drawing program. This picture shows the mockup–later the computer drawings for the buildings provided templates for cutting the real walls.
The sector plate was also built up on a single piece of basswood the same thickness as the ties. It’s pivoted on a piece of brass rod glued securely in the foam.
3.The messiest part of the construction so far is slathering a thin layer of plaster all over everything. I used joint compound (sometimes called “mud”), which is naturally lightweight and thin. The plaster layer gives shape and form to the terrain, can be sculptured in a variety of textures (the retaining wall at the back of the gully is carved from thick spackling compound), and plaster will absorb color washes beautifully when it’s time for painting.
At this point, the entire layout looked like an arctic wasteland, and some odd visitors began to show up to look over the Squarefoot (a sample is shown in this picture).
4.Now comes the fun part–painting. No skill is required. All terrain gets a coating of “earth” colors — washes of acrylic paint brushed everywhere. I used tubes of burnt sienna, yellow ochre, and raw umber. Just squeeze a bit from each tube onto a palette (a piece of wax paper is what I use), wet a brush with water, mix colors randomly on the palette, and apply. The Backstage area was painted with Polly S acrylic Engine Black, to make it disappear.
The realistic rust on the bridge girders came from a two-part antiquing kit–Instant Rust and Instant Iron. Just follow the directions on the bottles (from the crafts store). It’s so good that my next layout will be ALL rusty!
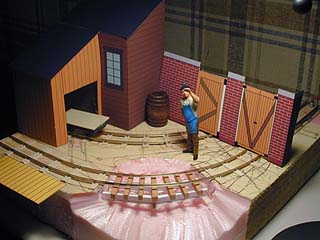
5.Ground cover transforms the arid, painted terrain into a realistic landscape. I use Woodland Scenics flocks of various shades of green, brown, tan, etc. as well as cinders and gravel — all from the hobby shop. If you’re on a tight budget, just dye sawdust with Rit dye and sift some gravel and stone from outdoors. I liberally apply Elmer’s glue diluted 1:1 with water, sprinkle stuff all over it until it looks good, then use an old eye- dropper to squirt some more Elmer’s on the whole thing.
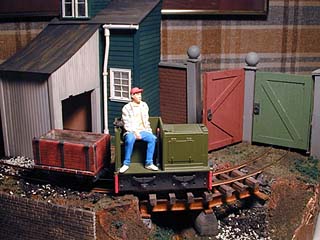
Variety and texture are the keys to realism in groundcover. Notice that the buildings are now nearing completion and the wall and gates have been installed. In my spare time I’m building rolling stock as well.
6.Details, details, details! You never have enough. They bring the layout to life. The most noticeable ones here are inhabitants (people and animals), shrubbery, a scattering of junk and above all, trees.
The trees are a very noticeable feature of the SFER, needed to mark the Estate’s boundary. They’re made from dried weeds. Working over newspapers, liberally douse the weeds with spray glue, then scatter on colored flock. Sift on dark colors from the top; then turn upside down and sift on lighter shades. Repeat until it looks good. The result will be a very realistic deciduous tree. Warning: this is by far the messiest operation in the entire construction job!
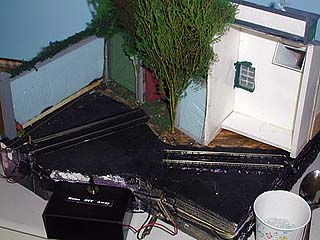
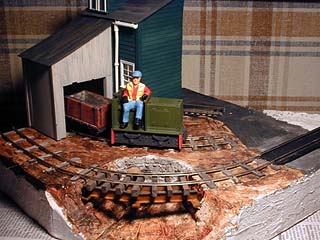
7.This Backstage view of the SFER shows most of the other construction details that make the little layout work.
Electricity is attached to the track ends at the righthand side and brought around to the back, to two brass posts embedded in the foam. A little battery pack with a DPDT center-off reversing switch is attached to the posts with alligator clips and feeds power to the one-speed locomotive. Flexible wires are soldered to the back ends of the sector plate rails also.
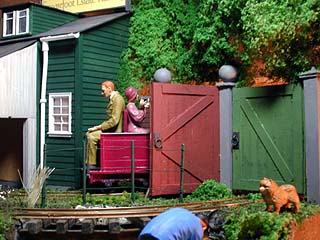
Just visible at the far left is the long rod that the Operator uses to open and close the green gate. The busy Op also uses the gravel and spoon at the lower right to fill the cars through the chute at the top right.