Industrial Prototypes
Humble industrial rail lines make wonderful prototypes
for micro model layouts — they’re small trains using
very tight curves and doing interesting jobs. This section
is devoted to industrial layouts modeled after real places.
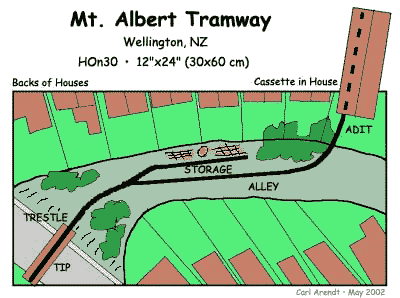
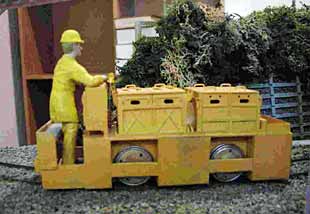
Here’s an opportunity to model an industrial tram exactly as it was and operate it prototypically. Not only that, but it gives new meaning to the phrase, “I have a railroad in the basement!” The Mt. Albert Tramway was a part of a project of the Wellington (New Zealand) City Council to build a new sewer tunnel beneath an existing residential neighborhood. The two-foot tramway entered the underground workings through the basement of a house (photo at right, provided by Kevin Crosado)!
The far end of the line was an elevated tiphead where spoil was loaded onto a truck for disposal. The tramway was operated by two battery electric locomotives which were often operated in tandem. The battery charging facilities were in the house basement. Materials were stored until needed in the alley right-of-way. What an opportunity for a model!
As drawn, the Mt. Albert Tramway is 1×2 feet (30×60 cm) in size, designed for HOn30 models. It’s a nearly exact copy of the actual tramway. The layout could easily be built in On2, Sn2, or HOn2. Scenery in my drawing is to 1:87 scale.
Many thanks to Kevin Crosado, Paul Napier, and Ben Calcott, group members who provided the information that made possible this layout design!
UPDATE: A Museum-Quality Model of Mt. Albert Tram! (March 2005)
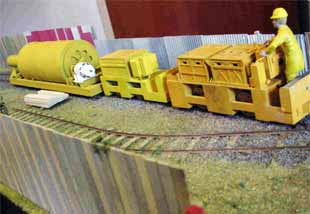
Paul Napier, who lives in Wellington, NZ, has built an exact model of the Mt. Albert Tramway (above). A little over six feet long, the layout is built on three interlocked baseboards and provides vritually an inch by inch replica of the actual tramway.
Paul did a lot of digging [pun intended] to find photos, diagrams, and plans of the WCC equipment that ran on the line. He scratchbuilt all four of the locomotives, along with various wagons and other rolling stock. The most notable features of the line are the house whose basement provides the entrance to the underground sewer tunnels (compare Paul’s model with the photo of the prototype at the top of this page!) and the tipper platform, a dual-track unit that was moved in from some other location (after considerable research, Paul is sure that the second track was never connected to the tram).
Scale of the layout is 1:24 (1/2 inch to the foot), and the gauge of the hand-laid track is 1 inch (25.4mm). Operation is materially assisted by a three track traverser (transfer table) behind the tunnel portal beneath the house. All three train consists found on the prototype line can be stored on the table and run alternately over the line to the tipping station and back.
One interesting piece of rolling stock that Paul modeled was a concrete agitator car that belonged to the WCC but never actually ran on the Mt. Albert line. It was so intriguing that Paul decided to build one to show its operation; the model is pictured below right.
After working feverishly to complete the layout in time for the annual Rail-Ex Model Railway Exhibition in Wellington during October 2004, Paul relaxed and enjoyed operating the layout for a few months. Currently he’s adding some scenic features and a sound system to enhance operations at the line’s next outing in July 2005. He hopes eventually to find a permanent home for it.Paul acknowledges with gratitude the assistance of Kevin Crosado and the late Peter Hodge, who both recorded the details of the tramway while it existed and later shared their archives.
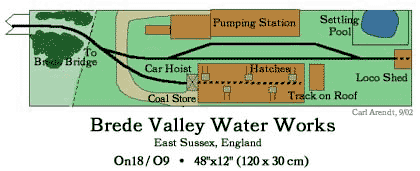 Brede Valley Water Works is another “true to life” modeling opportunity. The original 18-inch gauge line operated in East Sussex from 1899 to 1935, hauling coal and supplies to the Water Works from the barges tied up at Brede Bridge.
This layout is nearly an exact duplicate of the trackage and buildings at the Water Works. Of greatest interest to railfans is the Coal Store building, which was served by a hydraulic car hoist. The narrow-gauge cars of coal were lifted to the flat roof, where a long track gave access to a series of loading hatches. The cars were emptied by shovel into five bunkers below. What an opportunity to develop an unusual working model!
Other notable features of the little line were a “main line” that crossed many open fields, with a gate at each field boundary that had to be opened and closed on every trip; a locomotive shed that also formed the “end of the line;” and a delightful 0-4-0ST Bagnall saddle tank steam locomotive that served the line for its entire history. In this model, the tracks disappear into the trees at the left, onto a simple fiddle track where the little coal cars can be refilled for the next trip “up from the Bridge.”
Information for this layout design came from a wonderful small book, Sussex Narrow Gauge by Vic Mitchell and Keith Smith, published by Middleton Press in England in 2001.
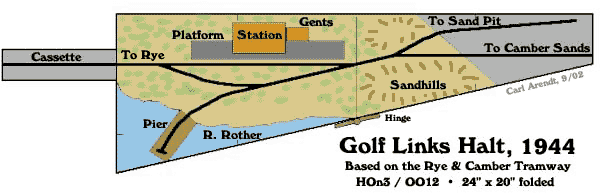
Strictly speaking, the Rye & Camber Tramway was not a tram. For most of its life it was a three-foot-gauge common carrier railway, delivering goods and passengers between Rye and Camber Sands, on the East Sussex coast in southeast England. But the line was abruptly closed to the public on the first day of World War II in September 1939. During the war it was operated as a tramway by the British Navy to transport military cargoes. In 1944, the time of our layout, a wooden pier with tracks was constructed in the River Rother to transship goods and materials from the railway. Golf Links Halt played a small part in the D-Day buildup.
This little layout depicts operations during the first half of 1944. Materials arrive from Rye (the cassette at the left) and are delivered to the pier. Carloads of sand, from the sand pit, arrive and are sent on toward the cement works near Rye. Cars filled with shingle (water-smoothed rocks) arrive from Camber Sands and are delivered to the pier. Passenger carriages deliver military men and pass on to either terminal of the line. Golf LInks Halt was a very busy place in wartime!
Layout construction makes use of an idea often illustrated in Model Trains International magazine — a folding baseboard, hinged in the front. When folded, the layout occupies a 24″x20″ rectangle, easily carried. Unfolded, it measures 48″x16″ and can be quickly set up on a standard table at exhibitions or train meets. The real-life R&CT boasted two wonderful little Bagnall 2-4-0 steam locomotives that dated from the 1890’s, as well as an immaculate Simplex-style petrol-engined locomotive that did most of the work in the 1940’s…all of which would make wonderful models. Perhaps some of our English readers can tell me whether any pieces of the attractive rolling stock of this railway are available as commercial kits?
Scenery pretty much follows the prototype, which is dead flat with lots of sand and scrub. The sandhills have been moved a bit north from Camber Sands, in order to help the right-side lines disappear gracefully into the fiddle yard. A wayside storage shed might do the same service for the lline to Rye. Opportunities abound for period items, including soldiers and sailors, cigarette advertisements, 1930s autos and lorries, and above all, “Loose Lips Sink Ships” posters (or whatever your favorite WW2 graphic might be)!
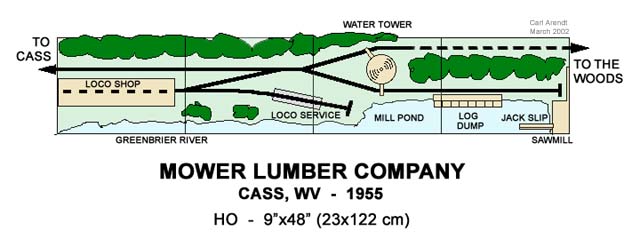
The lumber line headquartered at Cass, West Virginia, has been a spectacular piece of mountain railroading since 1903 — and it’s still going strong as a tourist line. The road has always featured shay locomotives operating on tight curves and 11% grades amid amazing West Virginia mountain scenery … it’s a railfan’s paradise.
This tiny micro layout depicts the line in 1955, near the end of its commercial life. Owned by the Mower Lumber Company, it brought hardwoods and spruce down Bald Mountain to the mill at Cass, right at the base of the mountain along the Greenbrier River. Our model’s track patterns diverge a bit from the prototype in order to fit into a small (9″x48″) space, but the operations performed are the same.
Flat cars of logs come down from the woods, a shay locomotive pulling with its nose facing uphill. By fortunate chance, the locomotive’s right side — with its fascinating cylinders and gears — is on display to the viewer at all times. The shay pulls its train clear of the wye switch, the brakeman bends the iron, and the flats are shoved into the mill track where the logs will be dumped into the pond (a real modeling challenge!).
The giant mill itself is mostly painted on the backdrop, with a few inches modeled in low relief to provide a backstage landing for logs that are hoisted up the jack slip, supposedly to the sawing room. A nice detail would be to model a gangway out into the pond with a couple workers using pikes to guide the logs into the jack slip.
The loco uncouples, takes on water at the famous Cass water tower, and backs down the track to Cass to pick up a carload of supplies at the Cass Company Store (actually, it will couple to a car that’s been placed on the track behind the concealing bulk of the loco shop).
The loco shop has been moved a few hundred yards south to the banks of the river, to provide a more accessible view of the lokeys. And the service track is placed “front and center” so we can enjoy the workings of the little shays. Eventually our loco hooks up again to the now-empty log flats, backs to clear the wye, and returns up the big hill. Cass is a marvelous place to visit — and it makes a wonderful working model in a very tiny space!
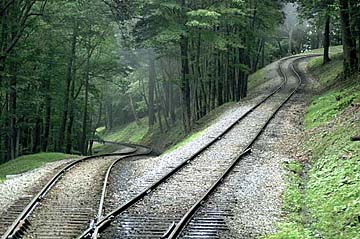
To give you a taste of the spectacular nature of the Cass railroad as it climbs Bald Mountain, here’s a photo of Switchback #2 taken on a misty August day in 2001. You can see the tight curves and part of an 11% grade (at left).
>
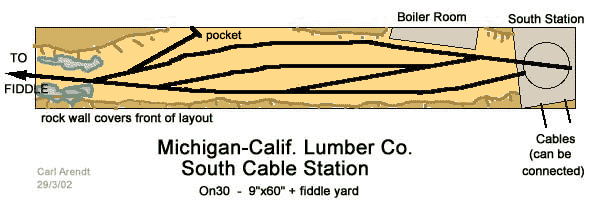
There’s an old adage in layout design: “When at all possible, let the prototype do the track planning.” A great example is found on the Michigan-California Lumber Co., a former three-foot gauge logging line in northern California.
Highlight of this appealing line was a car-carrying cableway 1500 feet above the valley floor and over half a mile long … spectacular, but a bit large for a micro layout model! However at the South Cable Station, on a narrow ledge carved into the steep mountainside, was a marvelous small yard that collected loaded cars, fed them to the cableway, and accepted cars coming back across from the North Station.
This little layout is almost an exact copy of that tiny yard. It receives cars from an offstage fiddle yard or cassette (at left), sorts and forwards them using tiny switch engines (steam or diesel), and gathers cars coming from the cableway into departing trains. The imposing South Station is modeled in part, but the cable line is of course a dummy. (Go ahead, though, if you’re ambitious — a working cable line would make an impressive model!)
The prototype South Station even boasted a small turntable, which we can use in our version to complete a space-saving runaround. So, in a very compact package, the Mich-Cal prototype railroad has provided us with everything we need: an opportunity to use road engines (geared or rod) for arriving and departing trains; tiny critters for switching in the yard (they hang out in the “pocket”); interesting rolling stock (there were some fascinating special cars for the cableway); and spectacular scenery — the rocky mountainside is modeled over the front of the layout (to the floor, if you wish!) and painted on the backdrop.
Who could ask for more? The drawing is designed for On30 scale, but the yard could easily be constructed in On3, HO, HOn3, HOn30, or other scales. Thanks to Jack Matson for calling this track-planning gem to my attention!
Big Steam in Duluth!
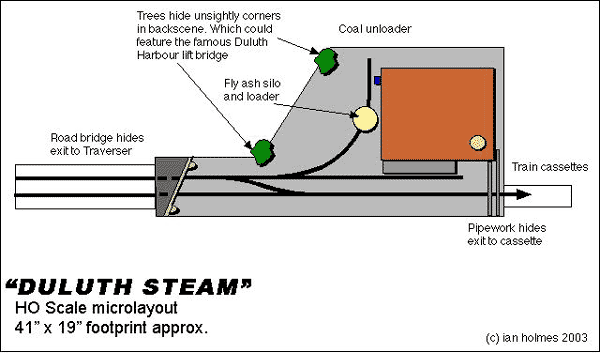
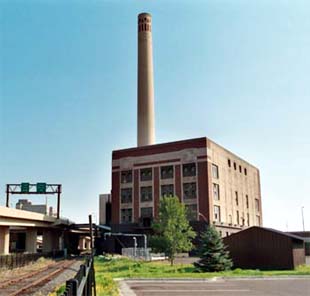
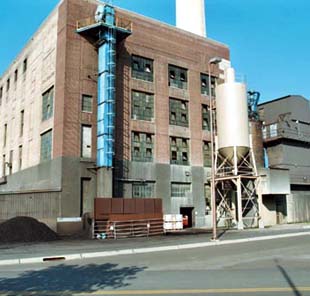
Sometimes an industrial scene glimpsed from a passing car or train can create an indelible impression in your mind — and a longing to model it! That’s what happened to Ian Holmes, from Minnesota, when he was visiting Duluth and found the generating plant of Duluth Steam. As Ian tells it:
“I’ve been dabbling with the idea of this Micro ever since I first went to Duluth and rode past the plant on the North Shore Scenic Railroad. The plant is surrounded by road overbridges, making convenient fiddle yard exits. There is really only one siding at the prototype, but I took the liberty of adding another one in front of the building for greater variety.
“The Duluth Steam plant has been in existence since 1899 to supply the downtown of Duluth with heat and power. The plant burns coal and wood so there would be two different types of traffic in, and the waste product from the burning — “fly ash” — is now used in the cement industry. So there would be some kind of hopper traffic out of the plant too.
“On top of that you could use the Preserved North Shore Scenic Railroad as an excuse for all kinds of passenger traffic. For example, one of their most popular trains utilises a Budd RDC Railcar.
“This layout could easily qualify as a starter layout . That 10” radius curve into the loading/unloading area is available from Fleischmann in their model track range, and the footprint for the power plant is based on the Walthers American Hardware Supply building. But many of those “Cornerstone Series” industrial buildings are pretty similar, so almost any could be used. Rix produces a highway overpass, and and you can easily add a couple of Woodland Scenics trees. Bingo! one Micro to go.
“I’m quite fond of this plan. maybe because I’m quite fond of Duluth,” Ian concludes. Here are two of Ian’s photos of Duluth Steam, to give you the flavor of the place.
Also worth noting is Ian’s masterly handling of two way traffic along a simulated main line route. He uses a replaceable cassette at one end to dispatch and receive trains; and a two-road traverser (transfer table) at the other end for the same purpose. Notice too that the traverser forms a runaround capability to help eastbound trains switch the industry.
In all, this little micro can keep three operators busy for hours — one shunting the industry, and two more at either end to dispatch, receive, and turn trains! A lot of railroading in a baseboard well under four square feet in area!
Leave a Reply