PAGE 80 – December 2008
H O T I D E A S F O R S M A L L R A I L R O A D S

In This Issue
Community Outreach: CliniMini Layouts
Forklift Layout: Switch Cargoes, Not Cars
Mixing Scales for Special Effects: Kidmoor
Shop Tips:
Double Loco Lift—An Easy Cassette
MagTrax—Using Rare-Earth Magnets
Couplers—A Quick Link & Pin
Cheap Locos—Cassette Player Motors for Power
Roundabout Thinking: A Working Car Ferry
No-Stall Switching: Easy RC Battery Locos
Just in time for the holiday season, here’s a plenitude of sparkling new ideas for small model railroad layouts! Perhaps one of them will get you started on a new project for the new year.
Here’s also a new idea for this page: a clickable table of contents — In This Issue. Not only is it a fast way to skip to a story you want to see, but you should easily be able to find an article in the future. Please let us know how you like this idea!
And keep an eye out for the mid-month Scrapbook to see results of our World’s Smallest Working Model Railroad Challenge!

NEW ZEALAND’S RAILEX 2008 MOUNTS A MULTITUDE OF MICROS
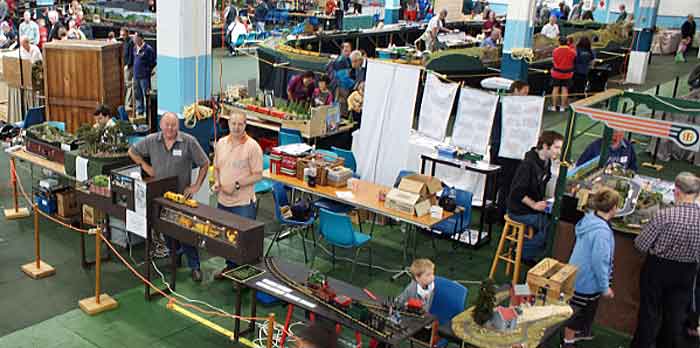
Last weekend Railex 2008, the annual model train show in Wellington, New Zealand, turned out one of the largest collections of micro and small layouts ever assembled. Gavin Sowry reports a total of 18 layouts fit the category of “small,” with nine of them exhibited by contributors to this Scrapbook.
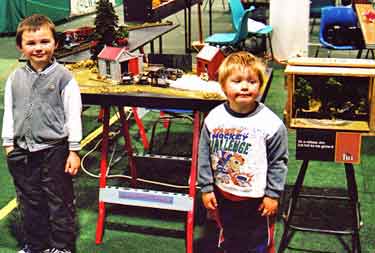
In the foreground of the top photo (by Murray McKenzie) are some of the micro layouts shown by Gavin and Murray, along with Paul Napier and Ben Calcott. “Public reaction,” reports Gavin, “has been fantastic… In the photo (below left) my two grandsons, Brody and Ethan, pose in front of Grandad’s display.”
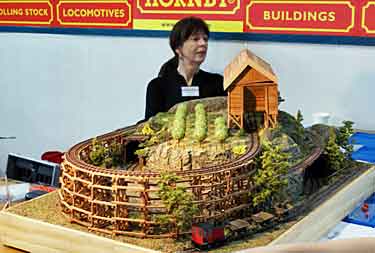
The other photo (below right), by Murray, shows his “long suffering partner, Sandra” at the controls of his Sylvester Chocolate Mine layout. Biggest problem at the mine was “children grabbing for the sweets before they were dumped, resulting in a lot of derailments. An ‘Electric Fence’ was quickly fabricated on Sunday morning, and this sorted the problem out.” No children were endangered in any way by this improvisation!
CLINIMINI LAYOUTS—DOING WELL BY DOING GOOD
CliniMini Layouts are an idea dreamed up by Bart Bakker, from Utrecht, The Netherlands. How about, Bart said, “thinking of layouts with a special purpose? For example, micro layouts for hospitalized children; layouts designed to cheer up sick or injured kids—call them CliniMini’s.
“Our modeling community could design them—and folks could build them—portable, rugged and simple, as our toy trains were. They would be designed from a bedbound child’s perspective. Thus, we could apply our ingenuity for a useful purpose, as well as having lots of fun. And of course CliniMini’s would be great for small children and grandchildren, too!”
Is that not a wonderful idea? Micro layout designers, while you’re doodling ideas for new layouts, dream up a few aimed at small children, perhaps confined to a hospital bed. Send your ideas to me, and I will publish a page of them (with full credits) in the hope of starting a really worthwhile activity. Gentlemen, sharpen your pencils!
FORKLIFT LAYOUT SWITCHES CARGOES INSTEAD OF CARS

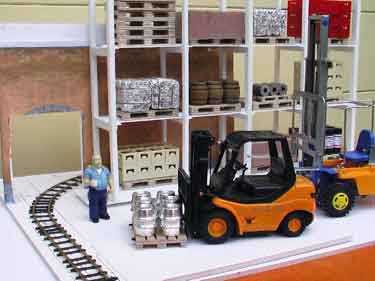
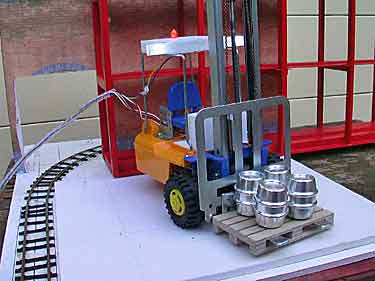
It all started when John Garaty, from Unanderra, Australia, found a working model of a forklift truck, made by Tamiya in roughly 1:24 scale and operated by tethered remote control. “Aha! This would make a great kernel for an industrial railway model!” thought John. The saga is still unfolding, but here’s the story so far.
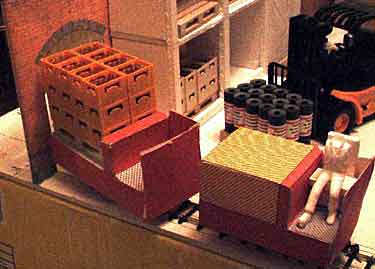
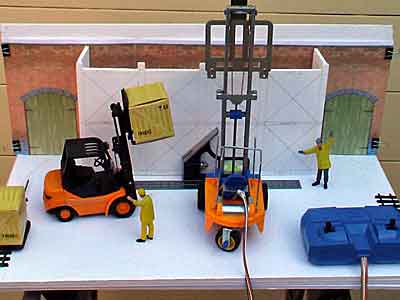 After some experimenting, John designed a Gn15 (1:22.5) layout (above right) to fit an A2 sheet of paper (420x594mm or 16.5x23in). He built a “proof of concept” mockup (left), and began rough designs of some rolling stock for it (above left). He also found another forklift model that operates on radio control, rather than a control tether (below left). The layout is basically a U-shaped track with the middle part hidden behind a backscene. In front is a rack of eight bins suitable for accepting forklift loads on pallets.
John named the line Random Stackum & Wreckem Inc. Here’s how it works. The Random Part: an electronic die cast assigns 1 of 6 pallet bin locations for “Stuff” to be moved to or from. The Stackum part: forklifts load and unload Stuff from narrow-gauge railway wagons. The Wrackem part: forklifts load the stuff into the assigned spots in pallet racks or take Stuff from the assigned spot for placement on the train and then removal offstage behind the pallet racks to the “rest of the world.””
Notice that this operating plan basically involves selecting and switching cargoes (loads), rather than switching railway cars. This is a very useful concept for small layouts that lack storage space for very many cars. The idea was introduced by Briton Andy Anderson in his layout, Cuddle, on this site and further explored in my book, Carl Arendt’s Small Layout Scrapbook.
After demonstrating the feasibility of the design, John’s next step was to work out the details. And there are a lot of them! The main issue was the controllability of the forklift model. Experiments showed that the “slippage” in the RC model was basically too large to be used on a small layout. So attention turned to fine-tuning the tethered Tamiya model (lower right), which is now being enhanced with flashing red beacons and headlights. John’s goal is to finish the layout in time to enter the micro layout contest at the Australian Narrow Gauge Convention, scheduled in April 2009 at Sydney. Stay tuned for more updates!
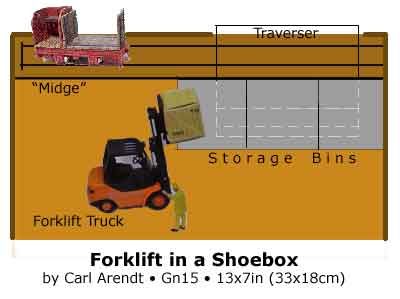
As you might expect, I couldn’t resist this one! After obtaining an RC forklift, I determined that it would fit in a shoebox laid on its side. So the layout becomes essentially half of John’s design. A self-propelled flatcar (such as “Midge” from Sidelines Models) appears from behind the scenes loaded with a palletized cargo. The fork lift removes the pallet from the railway car, trundles around to the storage bins, and stashes the cargo in an appropriate bin. This operation works in reverse, too, with the forklift removing a pallet and loading it onto the railway car. A hidden traverser allows easy access to manually load and unload the car (it slides under the storage bins in its forward position). Warning: I haven’t built this yet, and John Garaty’s experiments tend to show that the RC forklift may be too unwieldy for such a small space! Time will tell! —Carl Arendt
MIXING SCALES CAN ADD INTEREST AND DRAMA
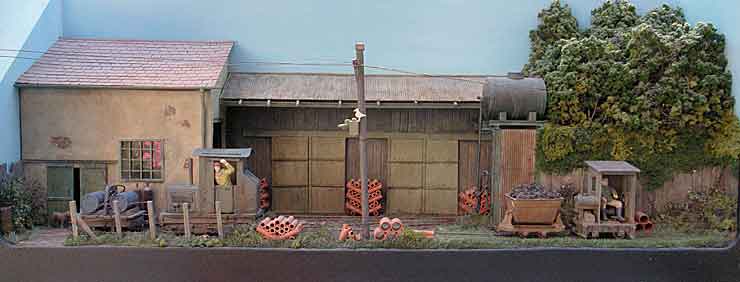
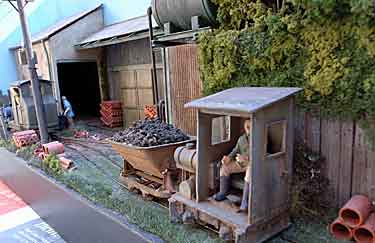
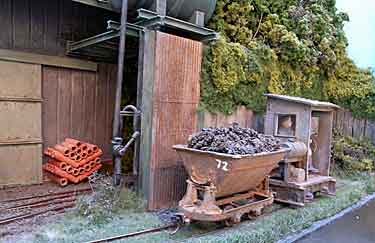
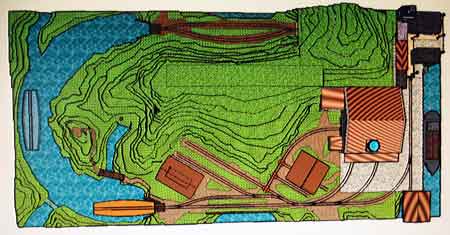
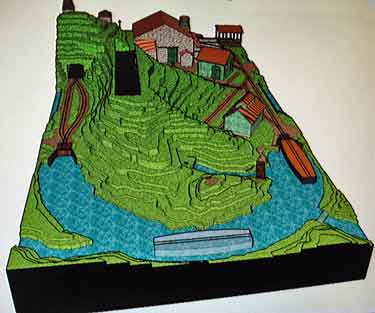
David Mitchell, from Reading, England, built Kidmore Pipe & Brick as a “working diorama” in a 28x7in (71x18cm) space. The scale? It’s nominally O-16.5 (On30) using Peco narrow-gauge trackage, 16.5mm wide. But David has judiciously mixed the scales he presents, to strengthen the effect of a husky, hard-working but diminutive railway.
For example, the track and scenery are British O scale (1:43.5), the figures are carefully chosen 1:32 people, and the rolling stock—all scratchbuilt—is a mixture of O and 1/32 scale items including two locos using Lima and Hornby chassis. The result, though tiny, is very evocative and most effective!
“The layout,” says David, “represents an early brickworks somewhere in the County of Hampshire, UK, where a 60 million year old supply of clay is packed closely together, removing the water, and then heated to high temperatures to allow the internal minerals to recombine. Clay is brought from offstage right in a tipper wagon into the Tipping Shed which can be seen on the left. The load is removed (through the backscene), and the loco departs with an empty wagon. The water tower to the centre is used to fill the bowser wagon which in turn is tracked to the Tipping Shed, reversed and refilled.”
The layout is still in the finishing stages. Signage, real rust (using Deluxe Materials Scenic Rust), together with a couple of additional figures still need to be added.

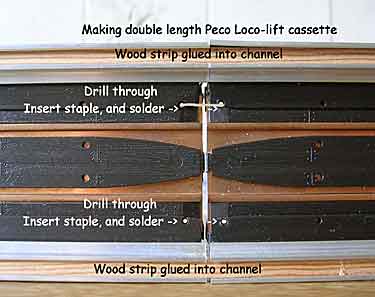
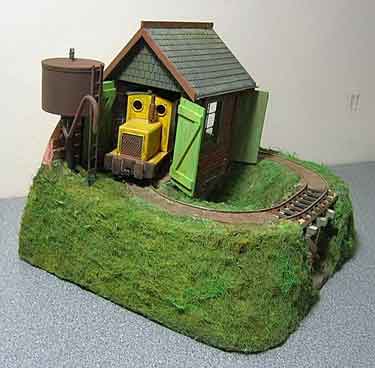
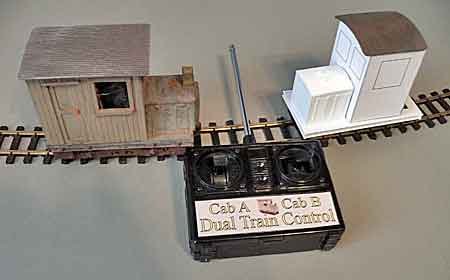
The Peco Loco Lift is a very useful product, often employed to turn around locomotives and even short narrow-gauge trains (see Carl’s layout, Peeks Pike, for an illustration). Using a little ingenuity, ‘Shortliner’ Jack Trollope, from the northern Highlands of Scotland, found a simple way to combine two Loco Lifts into a single 24-inch (60cm) train storage cassette, with rerailers and lifting handles!
It’s easy, according to Jack: “Leave the handle off one end of each Loco Lift, force some wood strip into the channel, glue it and push it up tight, then drill through the surface at the marks shown and solder a staple shaped copper wire through to ensure electrical continuity. This creates a 24-inch-long storage siding that acts as a re-railer and stock replacer. Not cheap, but very effective.” The photographs illustrate the simple construction.

A RARE TREAT: SHORTLINER TIP FOR USING RARE-EARTH MAGNETS
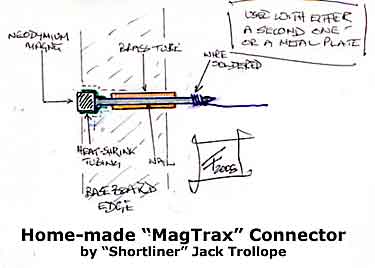
‘Shortliner’ Jack Trollope is also well known for using rare-earth magnets as a basic adhesive material in layout building. He connects modules, fastens down structures, and generally holds things together with these small, very powerful magnets. He even uses them to conduct electrical current between layout sections! How?
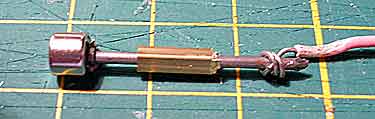
Jack explains, “You need some small, cylindrical neodymium rare-earth magnets (from eBay, or Google for suppliers), a flat-headed nail, brass tube and a small bit of heat-shrink tubing. The drawing (above left) should make it clear. I’ve added a quick mock-up (right), but without the heatshrink. The magnet will use its own ‘sticktion’ to fix to the nail, and current will pass straight through. Use a second one for the other end, or maybe a steel plate, or even a drawing pin! Note: It needs a small amount of movement available to ensure contact.”
PAPER CLIP MAKES ‘QUICKIE’ LARGE-SCALE COUPLER
Bim Bausman, from Honolulu, Hawaii USA, has independently invented the “paper clip” link-and-pin coupler, often used for larger scale trains. Because this question is so often asked, here’s Bim’s description of the invention:
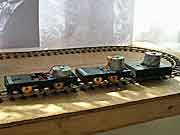
“I needed to get the flat car attached immediately for my Christmas Railroad. The picture tells the story… on the right, fiberboard temporarily stuck into coupler pocket of a newly assembled 1:20.3 flatcar kit. On the left, fiberboard epoxied to a ‘temporary lokey’ made of corrugated cardboard and a No. 1 scale NWSL power truck (45mm gauge). Small nails pushed in and then secured with 5 minute epoxy. All thanks to the pictures in one of Carl’s books.”
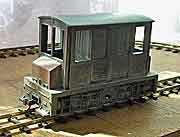
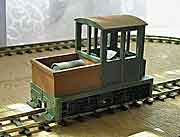
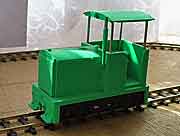
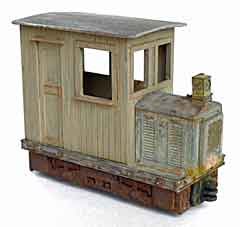
CASSETTE PLAYER MOTORS POWER AFFORDABLE, SMOOTH-RUNNING LOCOS
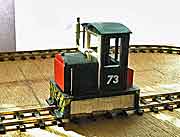
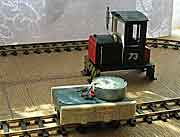
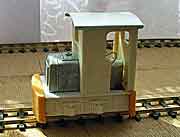
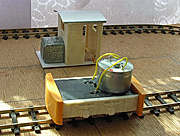
Andy Spooner, from Hailsham, Sussex England, has found a way to make very inexpensive On30/O-16.5 diesel locomotives that can navigate around three-inch radius curves! They’re perfect for micro layouts. Here’s Andy’s story.
“These are pics of diesels that I have constructed from Model Power Plymouth HO locos to use on my 0-16.5/On30 layouts. I have found that if you cut a section out of the middle of the chassis and replace the motor supplied with a small cassette or CD player motor (takes a bit of fiddling!) this produces a loco that will negociate 3in radius curves easily. Because of the quality of the motors these locos run silently and very slowly and smoothly. The chassis will stick well with Superglue. As cassette players are a thing of the past, it is very easy to pick them up cheaply. As they all seem to run on around 9v you can use either mains (household current) or battery units to canibalise. Either of the Model Power switchers can be used for this, but it does pay to change the rubber-tyred wheel for a plain one to help current pick-up.
“This way the modeller can have a loco for under £10 (about $15 USD) and a layout only eight inches wide that runs well.” The layout shown above is Andy’s test track for these little locos. It’s On30/O-16.5 and measures 8x9in (20x23cm)!
‘FERRY-GO-ROUND’ MAKES CAR FERRY AN OPERATING PIECE OF THE LAYOUT
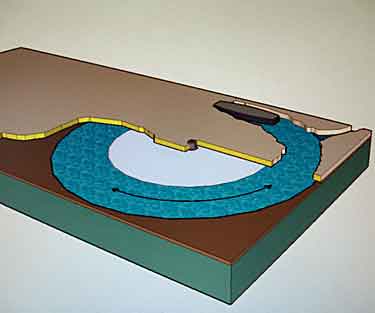
Daniel Caso, an Argentine living in Amsterdam, The Netherlands, has developed a way to include a working car ferry as a normal part of layout operations. The secret is a very large turntable, much like a kitchen Lazy Susan.
According to Daniel, “After hearing about a now closed pottery factory here in Holland that used to bring their small trains across the water on a tiny ferry, I decided to try a design with an operating ferry… I made a three-dimensional drawing of the result using Google’s 3D Sketchup software. The layout is not a micro (it is 165x80cm or 65×31.5in), but because it includes an operating ferry it can be a reference for other modellers. Scale is HOn30/OO9/H0e.
“The basic idea is a half round (180 degree) movement for the ferry with the water surface painted on an 80cm diameter disc to which the ferry is fastened. Half of the disc is always under the layout surface, and the edges of the stream are camouflaged with scenery.” The drawings tell the rest of the story. Ingenious idea!
SO MANY LAYOUTS, SO LITTLE TIME
By Bob Moroch
Frisco, Texas USA
I don’t think a month goes by when I don’t find at least one track plan on Carl’s site that I want to build and operate. My track plan folder has well over 100 layouts just waiting their turn.

I’m not opposed to “track-on-a-board” layouts. My Green Valley District layout (at right, and see Scrapbook #54) attests to my interest in “operations,” whether there is scenery or not. I’ve spent many an hour operating HO standard gauge trains on this one. (Scrapbook #57a describes operations on this intricate layout.)
I have a good collection of turnouts and track, so tacking down track on a piece of plywood is a quick and easy solution… but most of the track plans I want to try don’t lend themselves to standard gauge. They cry out for short, narrow gauge 0-4-0 critters operating short rolling stock. That’s where the problem comes in. Those 0-4-0 critters and layouts full of turnouts just don’t go well together. Short locos run erratically and stall on turnouts.
Instead of fighting these problems, I’ve eliminated them. How, you ask?
Battery Powered Remote Control
With batteries on board even a humble Model Power Porter Hustler becomes an excellent runner. All you need is a way to start, stop and change directions. Let’s get started.

The first order of duty is to select a suitable track plan. That’s an easy one: Emrys Hopkins’ Timewaster, with just a minor change.
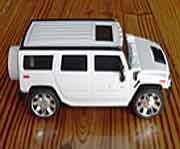
I already mentioned the Model Power Porter Hustler (right), so let’s start with that. Next, you need to add radio control. The easiest way to do this is to take an existing RC vehicle and use the components to operate your locomotive. I found this discontinued RC Hummer (left) at Radio shack for $5.00 USD. This is about as basic as they come. Just a single speed, forward and reverse. The steering isn’t very good either. PERFECT!
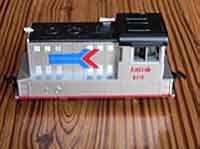
I removed the shell and wheels. The wiring (below) is fairly simple. One set of wires in from the batteries, two sets of wires out. One set connects to the motor and one set connects to the steering mechanism. Plus the antenna wire.
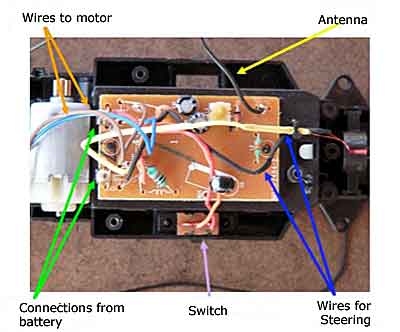
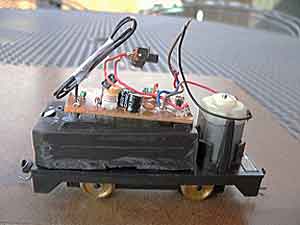
I snipped off the steering wires and disconnected the wires to the motor leaving them about an inch long. Originally I was going to remove the board and connect it to a separate battery holder, but since the holder was already in place and everything was connected, I just trimmed the chassis. I also removed the original motor from the Hummer. I removed the shell and weights from a Model Power Porter Hustler, then dropped the RC board and battery holder onto the Hustler chassis. The only thing left was to connect the two wires from the transmitter to the Porter’s motor.
Then comes a little body work (new 1:32 narrow-gauge loco body for the Hustler is shown at left). The RC installation and construction of the loco body are also described and illustrated in detail at the Free-Rails Forum website.
The receiver uses two AA batteries. You can’t control the speed, but it lopes along at a nice pace for switching cars. You can view how well it works, and how reliably the little critter negotiates complicated trackwork—just click on the arrow in the YouTube video below. Sit back, and enjoy the ride! (Notice, at one point you can see the white antenna from the remote control box in the picture. The loco is battery driven, under remote control at all times.)
Footnote: As a bonus, Bob describes—in another article from the Free-Rails Forum—a bonus attraction: a way to run a second locomotive from the same RC panel! Here’s the text of Bob’s report:
“Those cheapo RC cars come in 27 MHz and 49 MHz so you can run two cars at the same time. But since I’m only using one channel of a two channel transmitter/receiver, I figured I could get another 27 MHz car and use the steering channel to run the second train. That way I’d only have one transmitter. I chopped up another Hummer and gave it a try. Works like a charm (right).”
Leave a Reply